Narrating PowerPoint presentations is a great idea. There are a few challenges with just posting a narrated PowerPoint file in Blackboard. iPads and Chromebooks don’t play the sound. If a student doesn’t have PowerPoint, then they aren’t able to hear it, either.
Converting a .ppt File
Once you’ve narrated your PowerPoint presentation, what’s next? You’re going to want to export the file as a movie file.
Click this link for written instructions on converting a PowerPoint presentation to a movie. This video will also walk you through the steps. Remember to click the title of the video to watch it in YouTube at full-screen size.
Now that the file has been converted to a movie file, you need to upload it to YouTube. Anyone can sign up for a free Google account. For academic groups, we recommend creating one for a department and then share the login credentials with your group.
.PPT to YouTube
Now that the file has been converted to a movie file, you need to upload the movie to YouTube.
Click this link for written instructions on converting a PowerPoint presentation to a movie. This video will also walk you through the steps. Remember to click the title of the video to watch it in YouTube at full-screen size.
Embedding in Blackboard
Now that the file is uploaded to YouTube, you can create the link to embed the video into Blackboard. It’s easy and will only take a few minutes.
Click this link for written instructions on converting a PowerPoint presentation to a movie. This video will also walk you through the steps. Remember to click the title of the video to watch it in YouTube at full-screen size.
We answer a lot of Help Desk tickets. Some of them are easy, some more complicated. All of them are very important. The eStarkState team does their best to provide 18/7 Help Desk Support. During non-working hours, we monitor our email to catch tickets and solve them as quickly as possible. In order to best help, we need a little more assistance from you. When submitting a ticket, please provide the following information:
CRN of the course.
Name/location of the item needing support.
Student name, if the issue pertains to a particular student.
Details or the steps involved with the problem. Provide as much information as possible.
The name of the browser being used (remember Firefox or Chrome are the preferred browsers).
Another area of confusion is evaluating which Priority setting to choose. Please use the following guidelines for setting the priority of the ticket:
Urgent – Blackboard is down, not functioning, disabled or non-responsive.
High – Blackboard is functioning, but major components are unavailable/unusable. For example, publisher content isn’t linking, problems with tests not working, end of semester gradebook issues, etc. The instructor is in the classroom and needs IMMEDIATE support.
Normal – Blackboard is operating close to normal; however minor components are functioning abnormally or items are unavailable. Questions about gradebook (unless the issue is time senstive), merging classes, access to master courses, or other general questions.
Low – Blackboard is operating well. Support request has no timeline attached.
Once a ticket is submitted, one of us will get to it as quickly as possible. We are always happy to assist with any questions or issues you have. We thank you for helping us to solve your problems as quickly as possible.
Submitting a Help Desk Ticket
We all need a little help now and then. What’s the best way to get help with Blackboard?
Once you login, you’ll want to add a ticket. You can continue below with the written instructions or watch this video.
Continued from above:
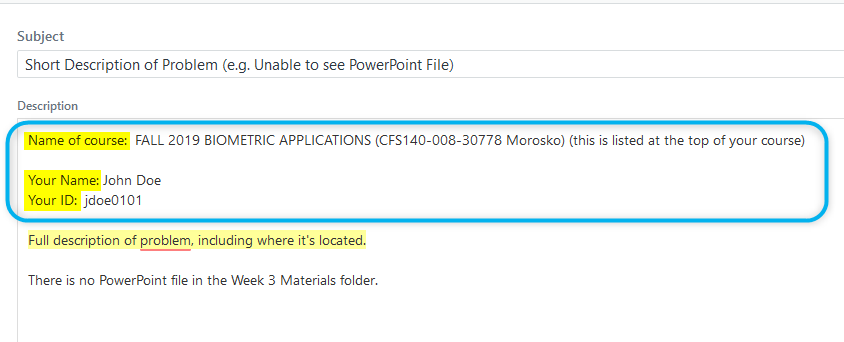
You will need to fill out the form to get started. Fill out your name and be sure you choose eStarkState as the Assignee.
Then complete the required areas on the form (highlighted in yellow below.
Now you can fill out the rest of the form.
We need as much detail as you can provide.
Name of course including the CRN
Instructor name
Your name
Your UserID
As much detail about the description as you can provide. Here’s a sample.
We want to solve problems quickly and providing us as much information up front, allows us to do just that.
By following the steps above, your ticket will be entered into the system and the next available eStarkState team member will pick it up and work to resolve your problem as quickly as possible.
Integrating Respondus Lockdown Browser into our Blackboard offerings has given us one more new and exciting tool! Students who are TRUE distance students and students who can’t make it to campus, can now take secure tests at home or work.
For example, I’m teaching a Web 3 class which has a student from the state of New York. They will not be able to come to campus to take a test and the proctors they’ve found in their area are charging $60 per test. This student is a perfect candidate for this option.
What’s needed:
Computer. Students need a computer, laptop, Mac, or Chromebook. With the exception of the iPad, mobile devices are not acceptable. Students using the iPad, must download the Lockdown Browser app from the App Store. Using a browser on the iPad does not work.
Software. Faculty send this link to students: Copy and paste the following link and send it to students who will use Respondus Monitor for secure testing.
NOTE: This software is intended for students who are truly at a distance or who otherwise have difficulty coming to campus.
There are limited seats for off-campus proctored testing.
Webcam. Students must have a Webcam. The software uses a webcam to alert the instructor to behavior that might look like cheating.
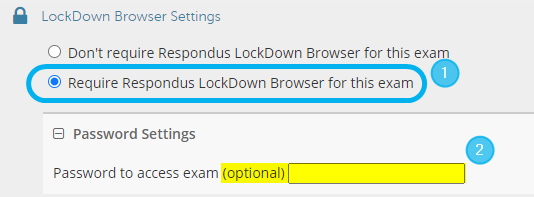
There’s one other change to setting up a secure test in Blackboard. Instructors will follow the steps found on the Using Lockdown Browser article. In addition to the steps on that blog article, you will need to open and edit the Monitor Webcam Settings.
Choose:
Require Respondus LockDown browser for this exam
Create and type in a password (this password is for the Testing Center only). Do NOT share this password with the students. This password is for the lab, not for off-campus secure testing. Feel free to use a password generator like this one to create a password.
Proctoring: Next choose whether this test will be proctored using Respondus Lockdown Browser, or one of SSC’s Testing Centers, or both!
Proctoring: If you choose to also allow the exam to be delivered via an SSC Testing Center, then the password in Step 2, above, is required. That password must be sent along with the other required documentation to the Testing Centers. Now the secure test is set for students on campus or off.
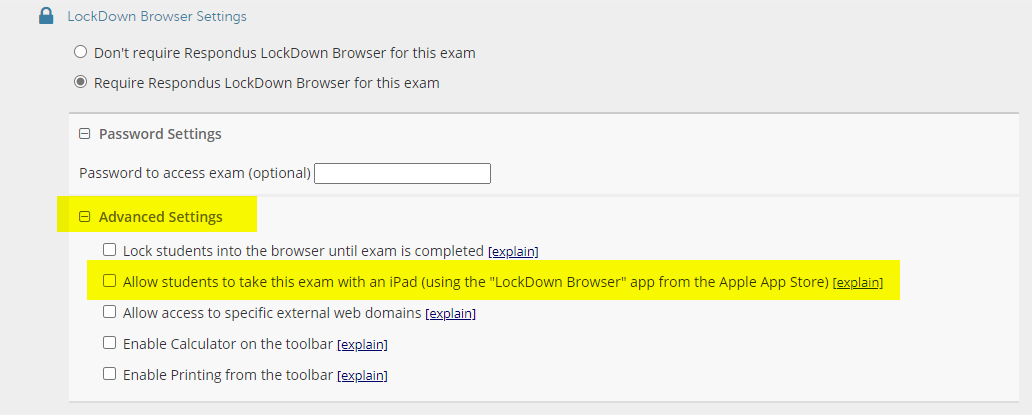
You also can choose what items you want in the Startup Sequence for Respondus Lockdown Browser with Monitor.
Using the iPad for Testing
If the instructor is OK with the use of the iPad for testing, the choice must be enabled in Advanced Settings:
There have been some exciting updates to Blackboard and we are so excited to share them with you.
Let’s have a drumroll please…our first announcement:
Manual Attendance Feature
THERE’S AN ATTENDANCE FEATURE!!!!!!!!!!! Some of you have been eagerly waiting for it and we hope you’re going to like it.
Bad news first, for those of you hoping for the attendance code (which you had in ANGEL) for face-to-face classes, that is not a feature at this time. You will need to manually take attendance.
The good news, the attendance feature is tied to the gradebook, so, you don’t have to add columns. You can mark students Present, Late, Absent or Excused. It’s got a beautiful interface and is easy to use. CAUTION!!! Unless you intend to use the Gradebook, DO NOT CLICK THE LINK IN THE COURSE TOOLS TO TURN IT ON. It will automatically add the Attendance column to the gradebook and it cannot be removed. It can be hidden, but, it doesn’t go away. Check out our blog article on this new feature.
Institutional Branding
We’re over-the-moon excited about the ability to add the eStarkState brand back into the LMS. It’s the small things that make our day!
Support for Large Monitors
Can you see me now???? We are thrilled to see the Bb environment FILL OUR SCREENS this week. Now Blackboard makes great use of whatever size screen you’re using. More room means less scrolling.
Gradebook Columns
Blackboard has improved the ability to read headings in gradebooks. We can actually read what’s in each column. Since we look at all of your gradebooks, we’re probably more excited about this improvement than you are!
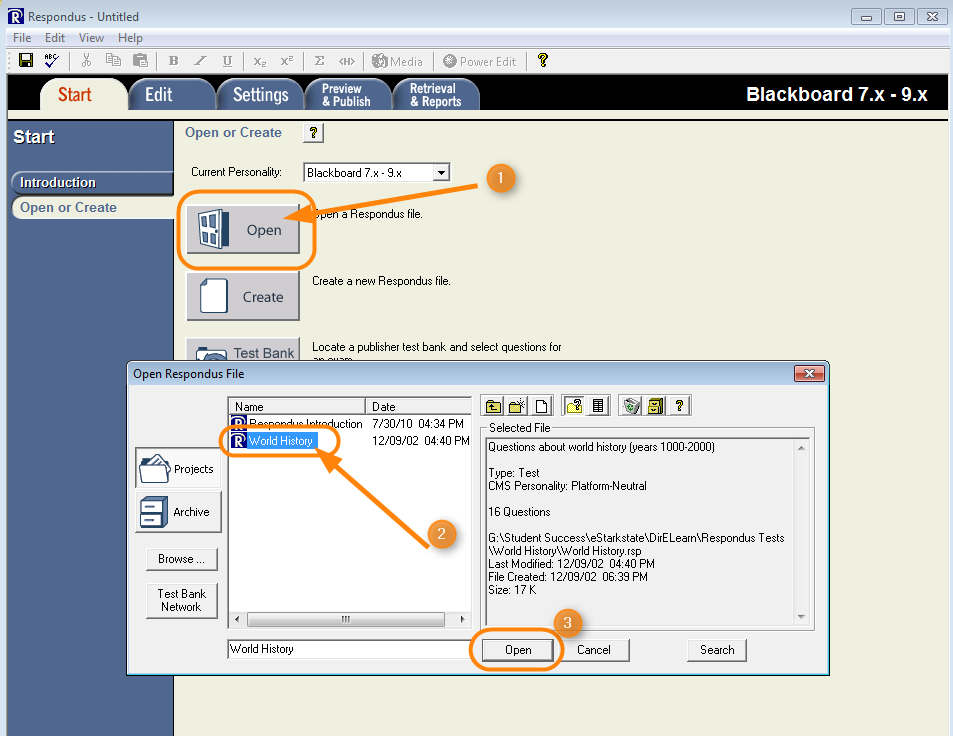
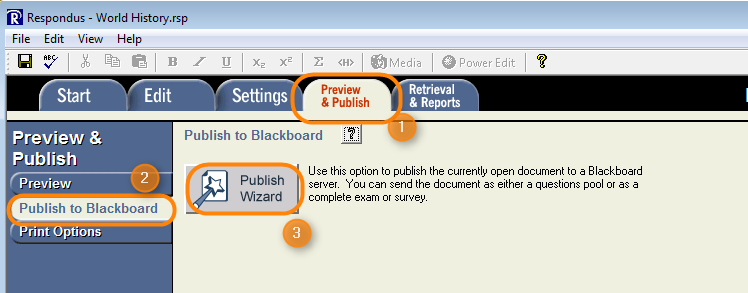
Once the test has been created in Respondus, you’ll want to upload it to Blackboard.
Directions:
Open the Respondus software on your computer and then open the test you created.
The test content will appear in the next window.
Click the Preview & Publish tab (1) and then choose the Publish to Blackboard (2) link on the left side of the screen. Then click the Publish Wizard button (3).
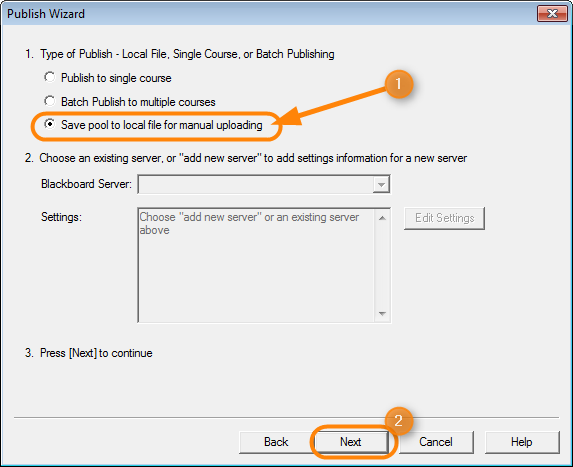
On the Publish Wizard screen, click the Save pool to local file for manual uploading radio button. Then click the Next button.
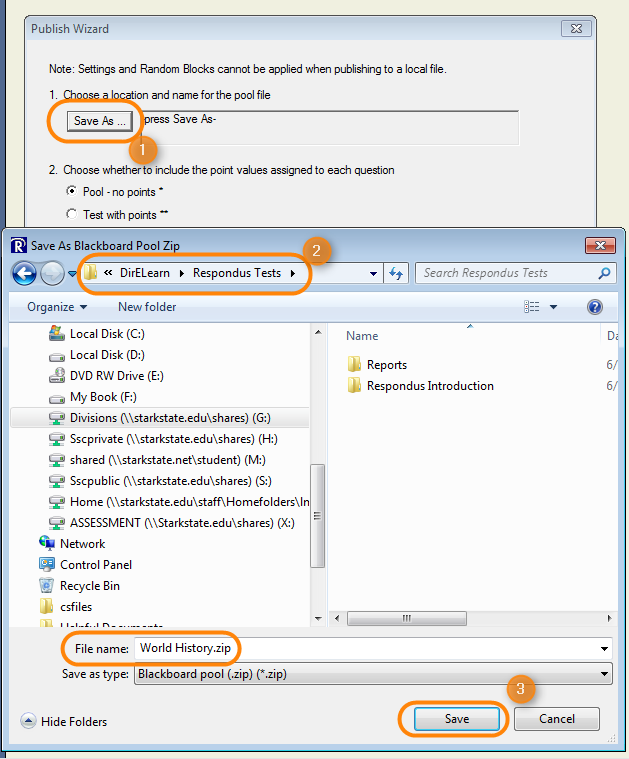
Click the Save As button, then when the Save As dialogue box opens, navigate to the location you want to save your tests and click the Save button.
You’ll see the location string in the Save As window. Use this to verify you’re saving the file in the correct location. In item 2, choose whether this is a Question Pool or a Test with points. Finally, click the Finish button.
Next, open the course in Blackboard to upload the test.
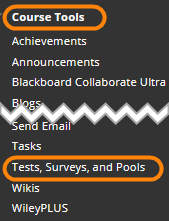
Navigate to the Course Tools and choose Tests, Surveys, and Pools.
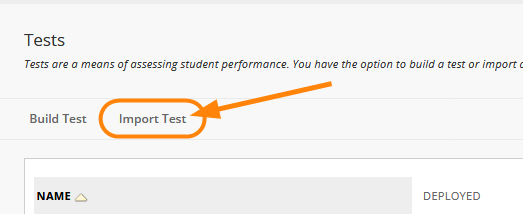
Choose the Import Test option.
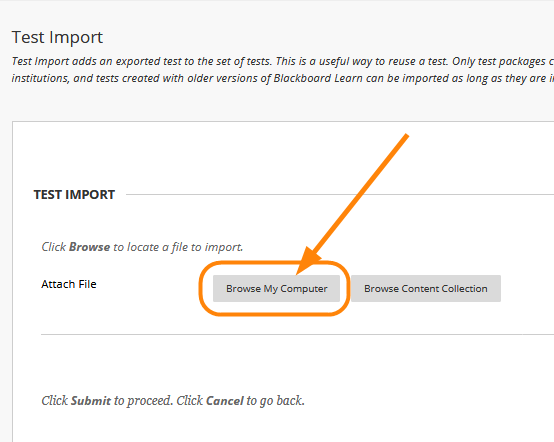
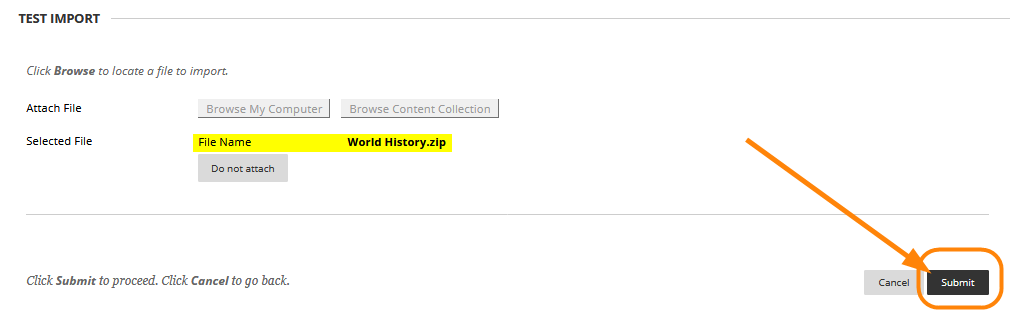
Click the Browse My Computer button to Locate the saved .zip file on your computer (Step 5 above).
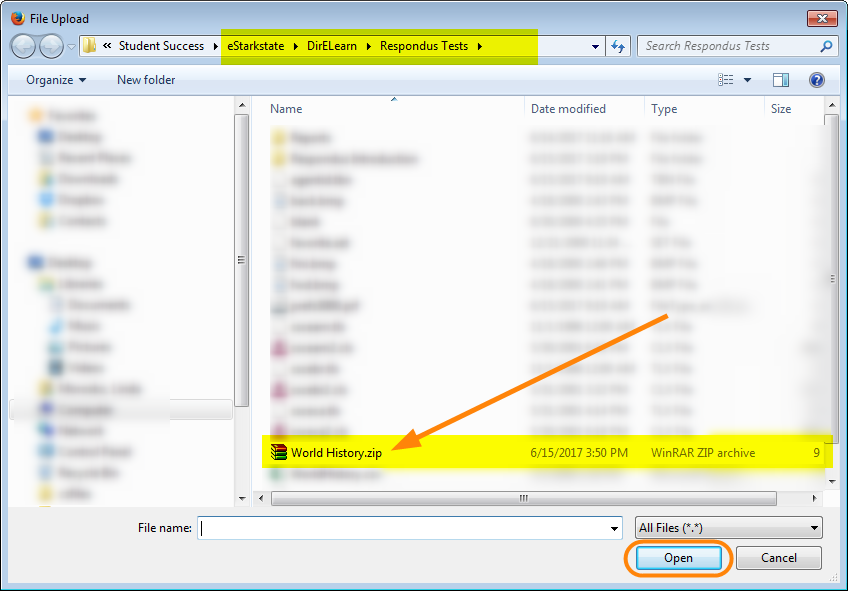
Find the file, click the file name and click the Open button.
Verify the file name and then click Submit.
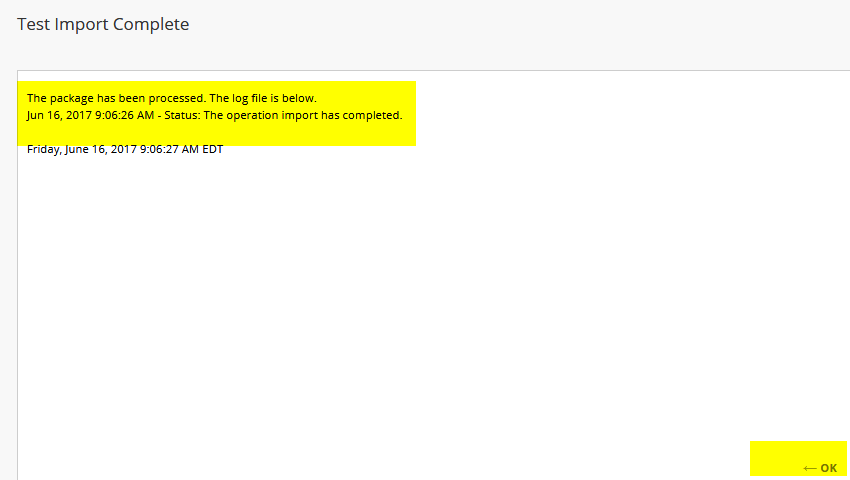
When the test has been imported, the following screen will appear:
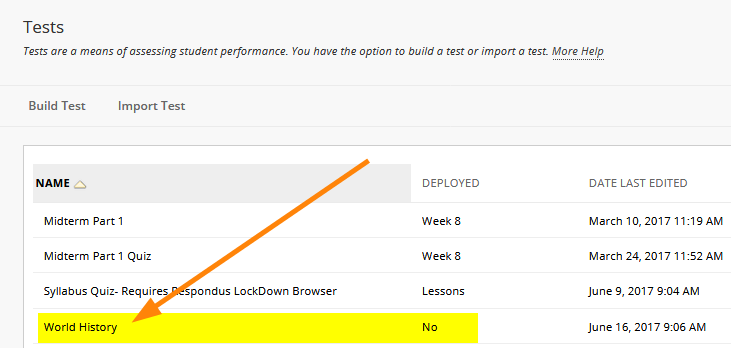
Click OK and the test will be displayed on the Tests screen.
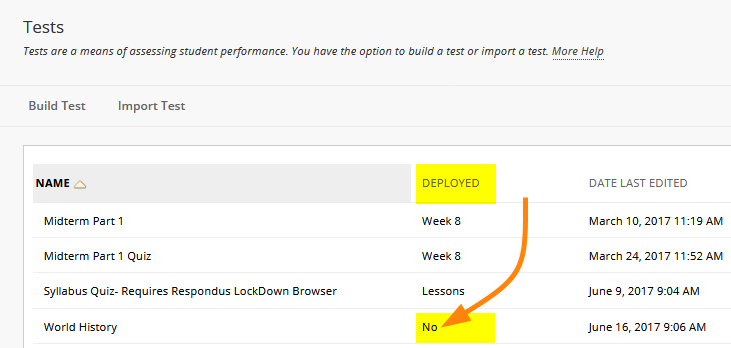
Notice that this test is set to “No” in the Deployed column. In order for the test to be accessible to students, it must be deployed.
If you want to review the questions, click the chevron and choose Edit to look at the questions in Blackboard. For more editing information, see the instructions on how to Add a Test.
This tutorial will walk you through how to create a group for group projects. You can provide groups several collaboration tools such as discussion boards and journals.
Directions for Groups for a Project:
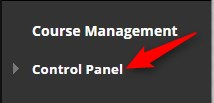
1. Go into your course.
2. Click Control Panel
3. Click Users and Groups
4. Click Groups
5. Click Create
6. Click Group Set – Manual Enroll
7. Enter the Name of the Group Set (Your will name individual groups later) and a description. This will be visible to the students on their groups page.
8. Under tool availability you will want to check only the tools you want groups to have access to.
9. Uncheck the Allow Personalization option.
10. Enter in the Number of Groups in the box.
11. Click Submit
12. Under Group 1 you will click Add Users.
13. Click the check box by each user name that you want to add to the group.
14. Click Submit
15. Repeat adding users for the remaining groups. After all users are added click Submit.
You have now added groups to your class. When the student logs in they will see these groups under their navigation. The next page will show you student view.
Student View of Groups
Under navigation the student will now see a My Groups link. When they click on that any groups that they are members of will display.
If the student clicks the Group Homepage they will see the following: