Search Results for "log in"

Add New Cengage Content

Adding Cengage Content to Bb – step-by-step tutorial pdf file

This tutorial can be applied to any of the Cengage products that implement into the LMS. If you do not see your publication, please contact your Cengage Representative so they can deploy it into Blackboard.

Before you begin you will need to have a Cengage account. If you do not have a Cengage account, go to http://www.cengage.com/us/, click on Sign In and create an account.

Directions for Adding a Link to Your Cengage Product:
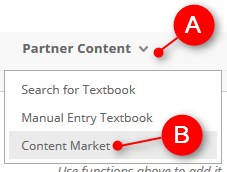
1. Click on Partner Content.
2. Click on Content Market.

Click on Content Market.

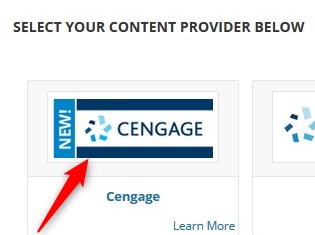
3. Click on the CENGAGE banner.

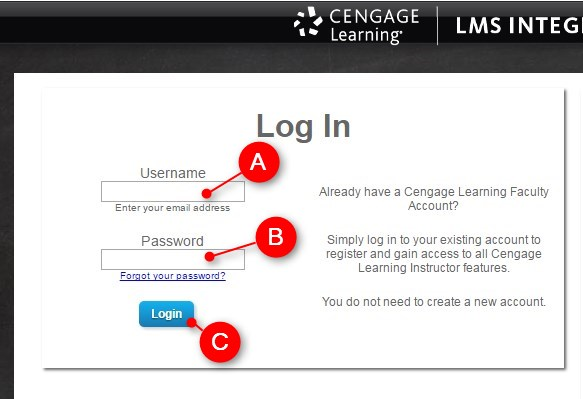
4. Enter your Cengage Username, password and then click on Login.

Enter your Cengage Username, password and then click on Login.

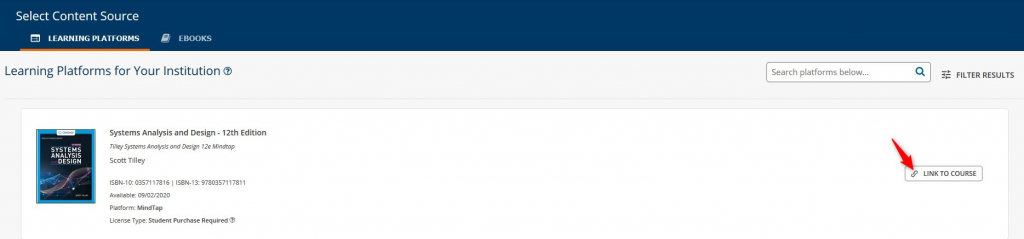
5. Find the Cengage publication you are using and click on Link to Course.

6. Choose the Create a new MindTap course option and click on Continue

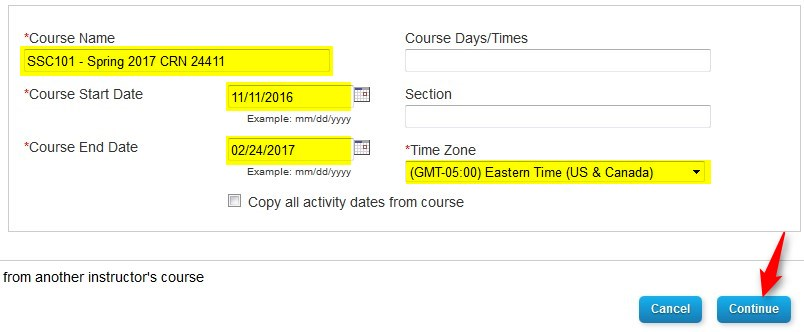
7. Enter the required course details (Course Name, Course Start Date, Course End Date, Time Zone) and click on Continue.

Enter the required course details (Course Name, Course Start Date, Course End Date, Time Zone) and click on Continue.

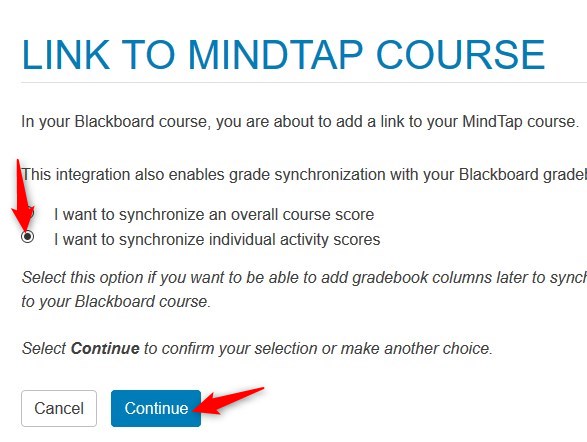
9. You well get the synchronize scores option. Click on I want to synchronize individual activity scores and click on Continue.

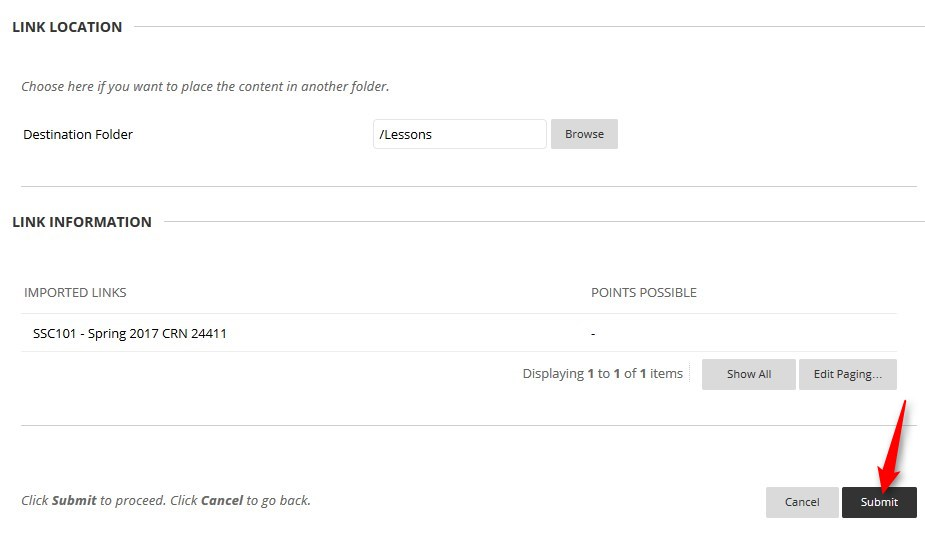
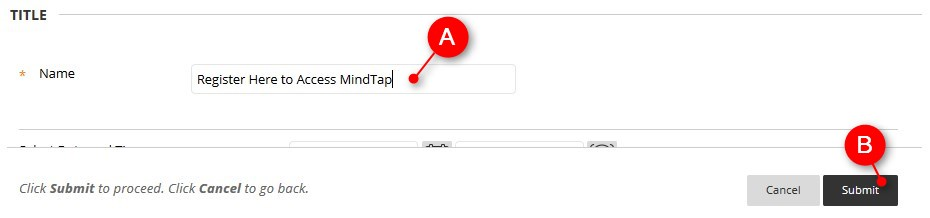
10. Click on Submit.

Click on Submit.

11. You can rename this link by clicking on the chevron located by the title and clicking on Edit.

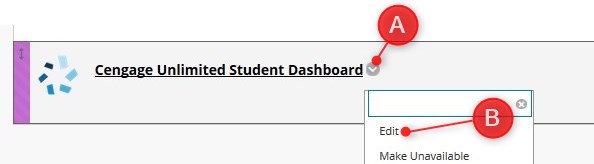
12. Edit the name of the link and click on Submit.

Change the Name and click on Submit.

Linking Specific Content
You may want to create links to specific content such as an assignment. This can be done after you have created your main link.

Directions for Linking Specific Content to Your Course:
1. Decide where in your course you want to put the content.

2. Click on Partner Content and click on Content Market

Click on Content Market.

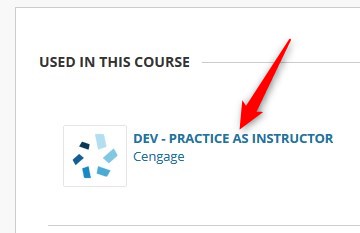
3.  Click the CENGAGE Course link at the top under USED IN THIS COURSE.

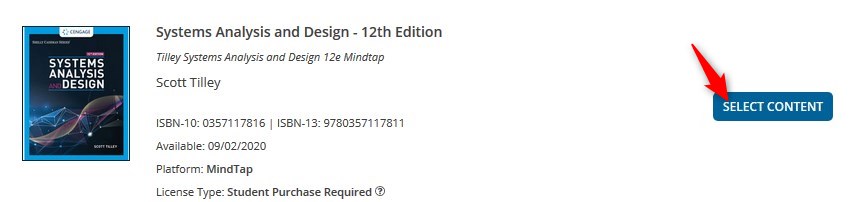
4.  Your selected text should appear at the top of the page. Click on the SELECT CONTENT button.

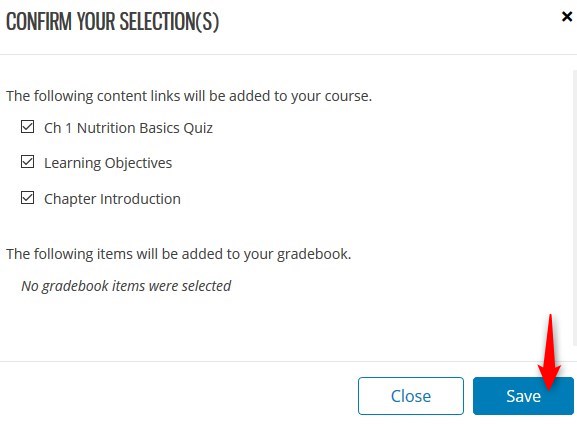
5.  Each content item has a check box next to it. Click in the boxes of the content you want to place in this area of your course. Click on Confirm.

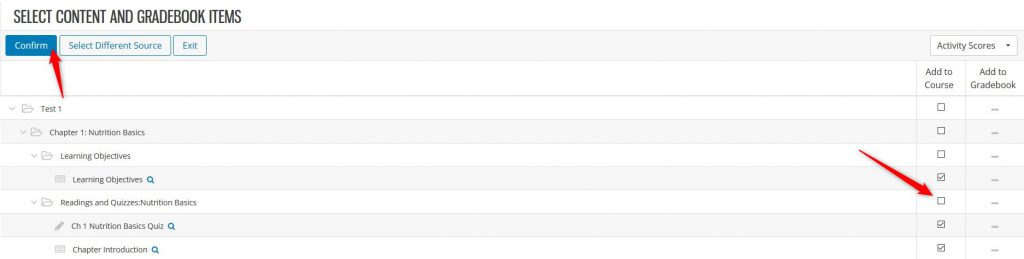
** Please Note: If it has Add to Gradebook it’s an item that will automatically push grades into your course. To disable this you would click on the check box.

6.  Review your selections and click on Save.

7. Click on Submit

Click on Submit

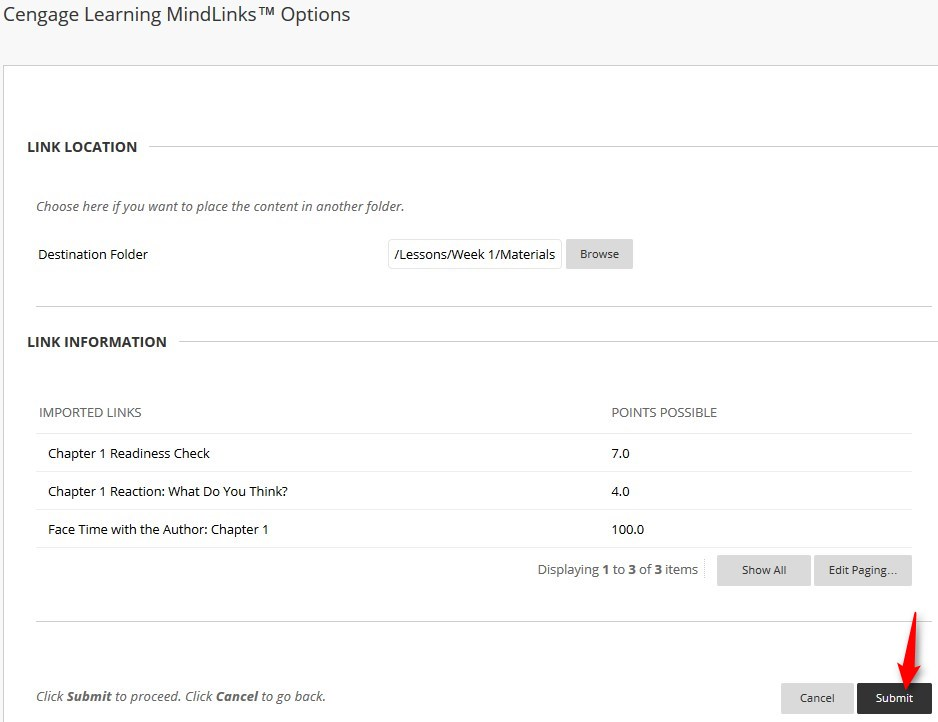
Your content will now show in the area you selected. If it’s a graded assignment you will also see it’s been added to the grade book.


Determine Never Attends

Never Attends – step-by-step tutorial pdf file

Never Attends must be submitted in mystarkstate.

This tutorial is for W3 and W4 instructors who need to determine online student attendance.

In order to be considered an active student and to avoid being removed as a Never Attend, a student MUST have completed an activity in the course.

Examples include:

  • completing a discussion post
  • submitting a  homework file
  • finishing a survey, assessment, quiz or test
  • completing any other activity that requires active participation and could be graded – it doesn’t have to be graded

Determining Never Attends has never been easier! Use the Retention Center and the Full Grade Center to determine attendance.

Directions:

  1. Go into your course and navigate to the Full Grade Center.
  2. Click the Last Access title to reorder the students by date of last access.
  3. If there are any blanks in that list, the student has never logged into the class.Last Access
  4. To further verify that this student didn’t attend, let’s check the Retention Center. Under the Evaluation section, click on Retention Center.
    2. In the Evaluation section, click on Retention Center.
  5.  Click on the Access Alert column.
    List of students who have never logged into class
  6. Click the Red Box at the top.
  7. The colored bars at the top indicate how many students Missed Deadlines, have Grade Alerts, Activity Alerts and Access Alerts. Pass your mouse over the Access Alert box and a pop-up message will appear telling you how many students haven’t logged in.
    The colored bars at the top indicate how many students Missed Deadlines, have Grade Alerts, Activity Alerts and Access Alerts. Pass your mouse over the Access Alert box and a pop-up message will appear telling you how many students haven’t logged in.
  8. After clicking the box on the far right, the Access Alert box pops up. Click on the number on the right side of the box for more detail.Last Access - Never
  9. You might see something like this. This pop-up window will tell you the last time students accessed the class. In the example below, one student has never accessed the class and one student hasn’t accessed for five days. The first student is a Never Attend.This pop-up window will tell you the last time students accessed the class. In the example below, one student has never accessed the class and one student hasn’t accessed for five days. The first student is a Never Attend.


  10. To be sure you have accurately assessed all students, check your gradebook to verify student grades by visiting the Full Grade Center.
    To be sure you have accurately assessed all students, check your gradebook to verify student grades by visiting the Full Grade Center.
  11. A quick glance at any Total column will tell you if the student has submitted any work. In this example, the students have submitted work. If the Total Points were zero, they would be marked as Never Attends.Logged In - No Grades


Check Needs Grading

You want to be sure you’ve checked to see if you have ungrades submissions before you make your Never Attend submissions.

  1. Navigate to the Grade Center > Needs Grading.Needs Grading
  2. Check to see if you have any items which need to be graded before you submit your Never Attends.Check for Submissions in Needs Grading
  3. Finally, go back to the Full Grade Center and review the assignments that were due before the Never Attend Drop Date. If you see an indicator like the blue circle below, that means the student has started something they didn’t complete or submit. Reach out to them and encourage them to submit the item. If you see the yellow circle with the exclamation point in it, that indicates and ungraded item. You’ll want to grade that item.In Progress and Needs Grading Indicators


Check All Student Submissions

For more information on EVERYTHING submitted you can run a Grade History report.

  1. Go to the Full Grade Center, click the Reports link and choose the View Grade History option from the dropdown box.View Grade History
  2. Choose the appropriate number of days to review from the dropdown in the upper right corner and click Go:Number of Days to Review
  3. A list of student activity will appear in the window:

    List of Student Activity

  4. The easiest way to see and manage the list of data (there are 13 pages of data here) is to download the file to Excel. To do that, click the Download link at the top of the list:Download
  5. Change the Delimiter Type to Comma and the Include Comments to Yes.  Click Submit.

    Delimiter Type and Include Comments

  6. Click the Download button to download the file to Excel.

    Download to Excel

  7. The following window will appear, be sure Open with Microsoft Excel is chosen and click OK.
    Open in Excel
  8. Sort the data by User so you can view one users submissions.

    Data

  9. You are now able to view student submissions:Submissions

Students who have been dropped for Never Attends, will still show in this list. You will be able to see if they submitted any discussion forums or other work.

~eSS

Save

Save

Save

Save

Save

Save

Save

Save

Save

Save

Save

Save

Save

Save

Save


Move to a different Category

Move a Graded Item to a different Category in the Grade Center – step-by-step turtorial pdf file

When you add any type of graded item, that item will automatically be assigned to one of the nine default categories – Assignment, Blog, Discussion, Journal, SafeAssignment, Self and Peer, Survey, and Test. However, a graded item can have their association with a Category changed or removed. To change a Column’s associated Category, follow these steps:

Directions:
1. Enter your course
2. Click Grade Center
3. Click Full Grade Center

Click Grade Center and Click Full Grade Center

4. Roll your mouse over Manage and click Column Organization.

Roll your mouse over Manage and click Column Organization.


5. Select the grade item, click Change Category to…, Click the appropriate Category, and click Submit

Select the grade item, click Change Category to…, Click the appropriate Category, and click Submit

Add a Category

Adding a Category in the Grade Center – Step-by-Step Tutorial pdf file

A Grade Center Category is a classification of Grade Center Columns. Categories are used to organize and view Grade Center data and can be used when creating Calculated Columns to perform operations on all Grade Columns in a Category. NOTE: The Grade Center has nine default Categories: Assignment, Blog, Discussion, Journal, SafeAssignment, Self and Peer, Survey, and Test that cannot be removed or edited.
When you add any type of graded item, that item will automatically be assigned to one of the nine default categories. Therefore, it is not necessary to add a new category unless you want a category that does not already exist in Blackboard.

Directions to add a new category:
1. Enter your course

2. Click Grade Center

3. Click Full Grade Center

Click Grade Center and Click Full Grade Center

4. Roll your mouse over Manage and click Categories.

Roll your mouse over Manage and click Categories.


5. In the Categories window, click Create Category

In the Categories window, click Create Category


6. Type the Name, add a description if desired, and click Submit.

Type the Name, add a description if desired, and click Submit.


7. Click OK to exit this window and return to the Grade Center. Even though the category has been created, in order to use it to organize grades it needs to be added as a calculated column in the gradebook. (See Adding a Calculated Column for more information)

Click OK to exit this window and return to the Grade Center.


Open/Close a Course – Make Course Available

Faculty are responsible to make their courses available each semester. Making a course available means that you have allowed access to your course in Blackboard. However, students CANNOT actually enter the course until the start date of the course AND the course is set to available.

Your course will automatically move from Upcoming courses to Current courses on the start date of the course. You will need to manually set the course to available.

The steps below will show you how to make the course available and how to check the start date of the course.

You can watch this YouTube video for step-by-step instructions:


Directions to OPEN a course/Make course available:

  1. Click on the course you want to make available.
  2. Go to the Customization and then click Properties

On the properties page, scroll down until you see Set Availability. Click the radio button next to Use Term Availability.

Then click Submit.

SPECIAL NOTE: Your class will still say PRIVATE until the start date of the course. Then the course will automatically move from Upcoming courses to Current Courses and the private icon will disappear.  The Private icon is okay as long as you have made the course available using the steps in this blog article.


Student Preview

Student Preview Option – Step-by-Step Tutorial .pdf File

Want to see your course through your students’ eyes? The Student Preview feature will allow you to experience your course exactly as your students do, including submitting assignments, taking tests, creating blogs, viewing grades, etc.

Directions:

  1. Click on the Student Preview icon in the upper right corner of the screen within your course. You can now view and navigate in your course like your students do

    Click on the Student Preview icon in the upper right corner of the screen within your course.

    Step 1

  2. Click Exit Preview to return to instructor view.

    Click Exit Preview to return to instructor view.

    Step 2

  3. When you exit Student Preview you will have a choice to keep your preview data or have it deleted. You will use the default choice: Delete the preview user and all data (Recommended) and click Continue.

    When you exit Student Preview you will have a choice to keep your preview data or have it deleted. You will use the default choice: Delete the preview user and all data (Recommended) and click Continue.

    Step 3

Save